
Install SAM with the installer
The installer puts a complete SAM in your own Cloudflare account from your browser: you sign in with Cloudflare, pick a domain, approve, and about half an hour later your SAM is live. With the hosted installer you need no GitHub fork, no terminal and no secrets, but read the note below first: for now most people have to host the installer themselves, which takes a terminal and a Cloudflare API token. Your agents’ machines then run on the cloud account you connect in SAM, as with any self-hosted instance.
Before you start
Section titled “Before you start”- A Cloudflare account with Workers Paid (SAM uses Cloudflare Containers, which need it). Cloudflare bills your account for what SAM uses.
- A domain that is active in that Cloudflare account. SAM lives at
app.andapi.on it, and each workspace gets its ownws-…address. - An email address for the administrator account.
You don’t need GitHub to install. Where your Cloudflare account has Cloudflare Artifacts, SAM can keep your projects’ code itself; otherwise you connect GitHub after setup.
Install
Section titled “Install”-
Open the installer and select Set up your cloud, then Sign in with Cloudflare. On Cloudflare, pick the account to install into and approve the permissions. What will SAM be allowed to do? lists them first. Your password stays with Cloudflare.
-
Choose your account. Pick the Cloudflare account and the Cloudflare domain; the line below shows the address SAM will live at. To put SAM under a subdomain such as
sam.example.com, open Use a subdomain instead and fill in Install under. A subdomain needs a Cloudflare Advanced Certificate for HTTPS; the domain itself is covered automatically. Enter Your administrator email: this is the only email that can create the first account on your SAM. Select Review installation →. -
Review your installation. The summary says where SAM will live, and What will be created lists the hostnames, the address sign-in codes are emailed from (
agents.on your domain), your account’sworkers.devaddress, and the exact SAM version (source commit) that will be built. Tick the box to confirm, then select Install SAM in my account →.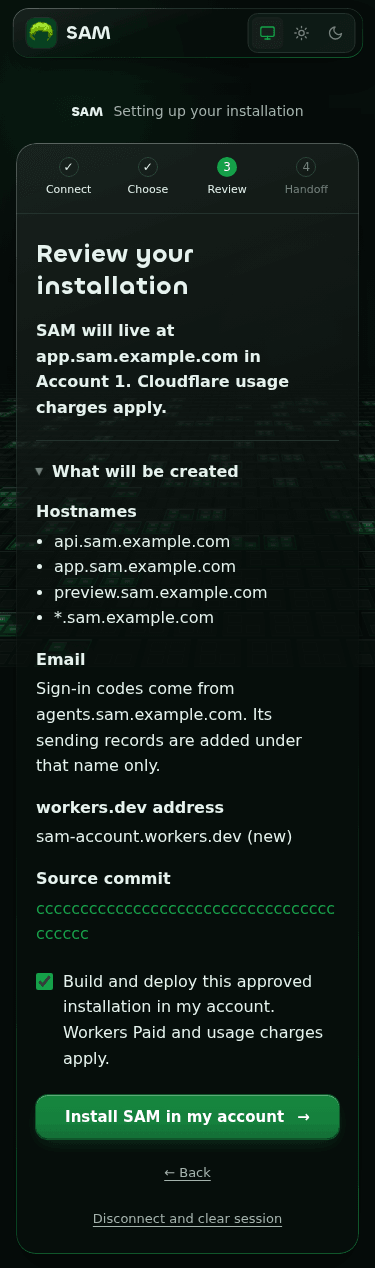
-
Save your recovery credential. The installer hands over to an installation service that now runs in your account and that only you control (Over to you. → Continue to my service →). It shows a recovery credential once: select Copy, save it in your password manager, tick I saved it., and select Open my installation service. You need this credential to come back later. Bookmark the page that opens too: it is your installation service, and you return there to update SAM.
-
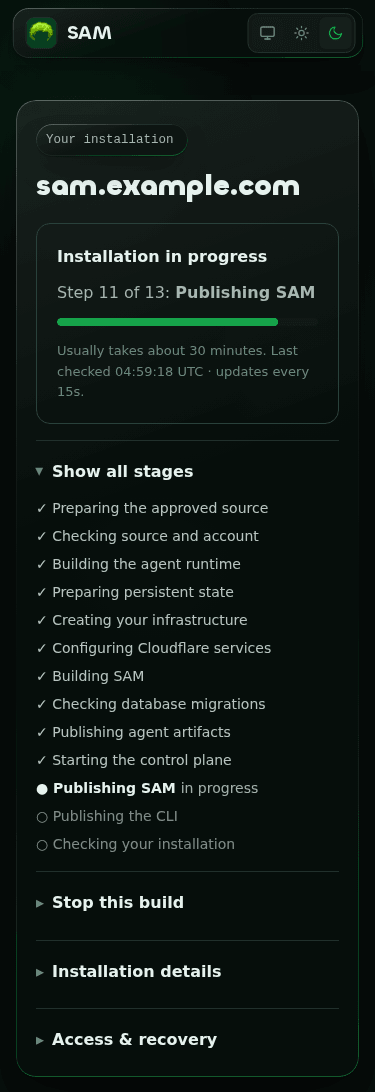
Start the build. Continue to installation controls →, then Install SAM. The page shows each stage as it runs (Step 3 of 13, with Show all stages) and refreshes itself. It usually takes about 30 minutes; when SAM’s latest release has prebuilt parts that match the version being installed, the installation service downloads and checks them instead of building them, which is quicker. You can close the tab and come back. Stop this build cancels it.
-
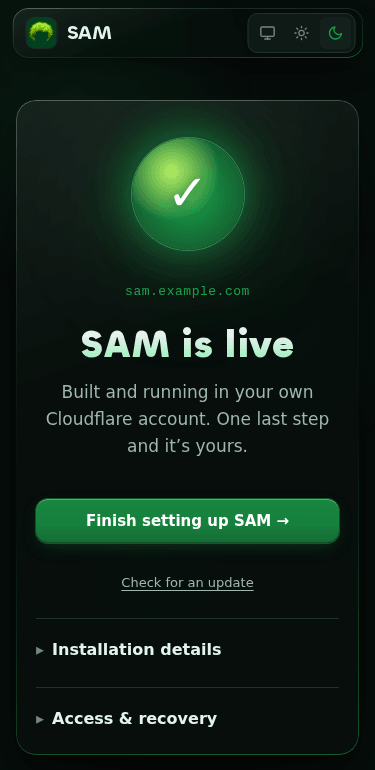
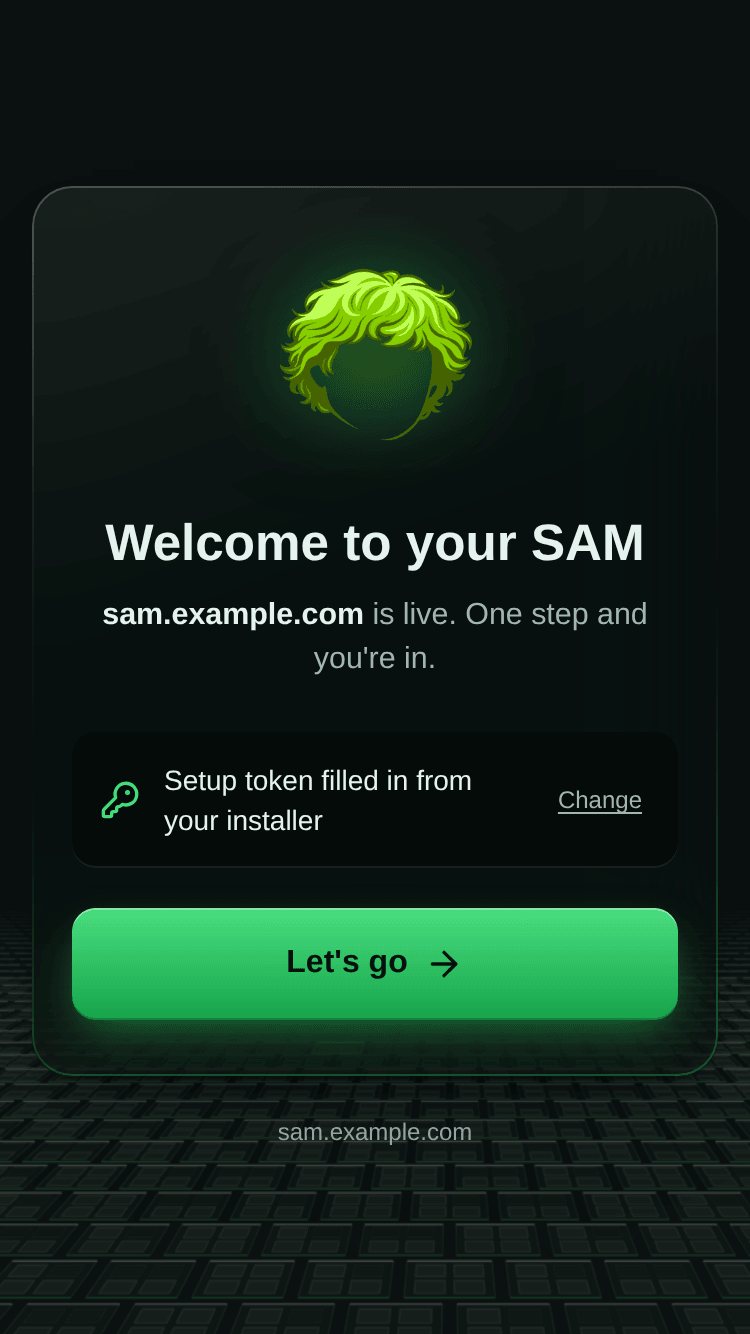
Finish setting up SAM. When the page says SAM is live, select Finish setting up SAM →. The next page shows your setup token; select Open SAM setup →, and your new SAM opens with the token filled in. Select Let’s go. If email sending is ready, SAM emails a sign-in code to your administrator email straight away; enter it to sign in, and SAM walks you through connecting an agent and creating your first project.
If Cloudflare is still verifying the address SAM emails from, setup says so: try again a few
minutes later. If email couldn’t be set up at all, setup asks you to choose how you’ll sign in
instead, with a GitHub, Google or GitLab OAuth app whose Client ID and Client secret you
enter, then Finish setup. Platform integrations after deploy
in the self-hosting guide explains how to create each app. For Google sign-in, register the redirect
address https://api.<your domain>/api/auth/callback/google.
Let other people in. An emailed code only creates the administrator’s account: everyone else needs another way to sign in the first time. Once you’re in, add GitHub, Google or GitLab sign-in in Admin → Integrations (see Platform integrations after deploy), then invite people to your projects. If you turned on signup approval, approve them in Admin → Users.
If the review is blocked
Section titled “If the review is blocked”Review stops before anything is created when something on the domain is in the way: existing DNS records or Workers routes on the hostnames SAM needs, or no active certificate for a subdomain. The message names what it found. Select Use a different domain, or remove what is in the way in the Cloudflare dashboard and select I’ve removed them — check again. An earlier installation you deleted can leave routes behind that block a new one on the same domain.
If the build fails
Section titled “If the build fails”The page says Installation needs attention and which stage it stopped in. Select Retry deployment to resume; work that already finished is reused. Technical details has the error to include if you report it.
Come back later
Section titled “Come back later”The installation service is a Worker in your account named sam-maintenance-…, at its
workers.dev address. Bookmark it when you first open it; you can also find it under Workers &
Pages in the Cloudflare dashboard. Opening it asks for your Recovery credential (Open your
installation service).
Under Access & recovery you can Replace recovery credential (save the new one before you
confirm; the old one keeps working until then) and Sign out. A session lasts 24 hours.
Update your SAM
Section titled “Update your SAM”In the installation service, select Check for an update. If a newer SAM release exists, Review your update shows which version it would install; select Approve and deploy this version. Updates only move forward to newer releases. An update changes SAM’s code, not its data: it is not a database rollback, so rolling back to an older version isn’t offered.
Remove an installation
Section titled “Remove an installation”There is no automatic uninstall. To remove SAM, delete its Workers, storage and DNS records in the
Cloudflare dashboard, then the sam-maintenance-… installation service, and revoke the
installer’s authorization in your Cloudflare profile. Keep any data you want first. Leftover
Workers routes block a new installation on the same domain until you remove them.
What the installer can access
Section titled “What the installer can access”The hosted installer receives a short-lived Cloudflare OAuth token with the permissions you approve, for 15 minutes by default. At handoff it passes the work to the installation service in your account and drops its own copies. Deployment permissions can cover existing Workers in that account, not only SAM’s. You can revoke the authorization from your Cloudflare profile at any time; that doesn’t delete what was already created in your account. The installation service stores a hash of your recovery credential, not the credential itself.
Host the installer yourself
Section titled “Host the installer yourself”Self-hosting lets you review and pin the installer source, then run it in an account you control. You do not need to deploy the main SAM application to host the installer.
Before you start
Section titled “Before you start”You need:
- A Cloudflare account with Workers Paid enabled, and a domain active in that account.
- Node.js 22 or newer and pnpm 9.15.9.
- The SAM repository, checked out at the version you want to trust.
- A Cloudflare API token scoped to that account and zone, with Account Settings Read, Workers Scripts Edit, OAuth Client Read/Write, and permissions for Workers Custom Domains and Workers Routes. Review Cloudflare’s current permission names before granting access.
Deploy
Section titled “Deploy”Install the repository dependencies, then supply your account credentials through your shell or secret manager. Do not commit the token or paste it into an issue or chat. INSTALLER_MODE=full is what lets the installer install SAM; without it, a new installer starts in bootstrap mode and only creates the installation service.
pnpm install --frozen-lockfileexport CLOUDFLARE_API_TOKENexport CLOUDFLARE_ACCOUNT_IDexport BASE_DOMAIN=example.comexport INSTALLER_MODE=fullpnpm --filter @simple-agent-manager/installer run deployThe deployment creates the installer at https://install.example.com, provisions its private OAuth client, and stores the client credentials as Worker secrets. It uses its own session storage and does not share marketing analytics or SAM login sessions.
Open that address and sign in with Cloudflare. Private clients can only be authorized by members of the owning Cloudflare account. Public promotion is self-serve: supply a name, logo, client URL and scopes, verify the client URL’s domain with a DNS TXT record, then change visibility to public. There is no approval queue, and promotion is permanent. See Cloudflare’s domain verification and public-client setup.
What full mode asks for
Section titled “What full mode asks for”In full mode the installer’s OAuth client asks for the broader permissions an installation needs: Workers, KV, R2, D1,
Containers, DNS, certificates, Workers routes, AI Gateway, API tokens, email sending and routing,
and Cloudflare Artifacts (the full list is FULL_SCOPES in apps/installer/scripts/deploy.mjs).
Redeploying without INSTALLER_MODE keeps the deployed mode. The deployment publishes the installer
before it creates or updates the OAuth client, so a token without OAuth Client write permission
leaves an installer whose health check never reports oauthConfigured.
Use an existing OAuth client
Section titled “Use an existing OAuth client”Set OAUTH_CLIENT_ID and OAUTH_CLIENT_SECRET before running the deployment command. The client must use Authorization Code with client_secret_post, the callback https://install.example.com/oauth/callback, and, for bootstrap mode, the scopes account-settings.read workers-scripts.write. A full-mode installer’s client needs every scope in FULL_SCOPES (see What full mode asks for). Do not use workers-scripts.edit: it is the Workers Editor role, which cannot create the installation service Worker. Refresh tokens are not requested.
If initial client creation succeeds but saving its secret fails, rotate the secret in Cloudflare and supply it through these variables before retrying. Rerunning deployment normally preserves the existing client and secrets.
Remove your installer
Section titled “Remove your installer”Delete the sam-installer-self-hosted Worker and its OAuth client in your Cloudflare dashboard. Remove only the sam-maintenance-… services and durable state belonging to installations you no longer need, and revoke outstanding installer authorizations. Installations it made are separate: they live on in the accounts they were installed into (see Remove an installation). Review the installation’s recorded resource identities and retain needed data or backups before deleting them; there is no automatic uninstall.
Inspect the code
Section titled “Inspect the code”The standalone app, deployment configuration, tests, and developer README live in apps/installer. The hosted and self-hosted versions use this same app. Source visibility helps you audit it; it does not prevent a hosted operator from changing the running code.