
Collaboration & Shared Projects
A SAM project can be shared with a small team. Members work in the same project — they see each other’s chat sessions, reuse the same agent profiles and skills, and run against the same repository — while every member’s personal API keys and cloud credentials stay their own.
This guide covers the whole collaboration loop: inviting people, approving access, what teammates can and cannot use, working together in a chat, and how to keep track of whose keys are paying for shared work.
Collaboration is designed for small, trusted teams (roughly 3–10 people). Both owners and admins can approve new members, so approval does not bottleneck on a single person.
How access works
Section titled “How access works”SAM does not send email invitations. Instead, access is a three-step flow:
flowchart LR A["Member creates<br/>invite link"] --> B["Recipient opens link<br/>and requests access"] B --> C["Owner or admin<br/>approves or denies"] C -->|approved| D["Recipient joins<br/>as an admin"]- Any active member creates an invite link from the project’s settings.
- The recipient opens the link and requests access — the link never grants access on its own.
- An owner or admin approves (or denies) the pending request. Approval adds the person to the project as an admin (see Roles).
Because the link only produces a request, sharing a link is safe: nobody joins your project until someone with permission approves them.
Two roles are in use today: owner and admin. (Throughout this guide, member just means anyone in the project — the only roles are owner and admin.) Roles control who can manage the project and its members — they do not change whose credentials pay for work (see Credential attribution).
| Capability | Owner | Admin |
|---|---|---|
| Everyday work — chat, tasks, triggers, deployments | Yes | Yes |
| Create and revoke invite links | Yes | Yes |
| Approve or deny access requests | Yes | Yes |
| Remove other members (anyone except the owner) | Yes | Yes |
| Manage connections, secrets, and infrastructure | Yes | Yes |
| Transfer ownership | Yes | No |
| Delete the project | Yes | No |
- There is exactly one owner per project — the person who created it. The owner can transfer ownership to another member (who becomes the new owner); the previous owner stays on as an admin.
- Everyone you approve through an invite joins as an admin. Admins can do almost everything an owner can — approve and remove other members, create and revoke invite links, and manage connections, secrets, and infrastructure. They only lack transferring ownership and deleting the project.
Because approval grants admin access, only invite people you trust with full control of the project. Collaboration is built for small, trusted teams; finer-grained roles (read-only or limited members) are planned but not available yet.
Invite a teammate
Section titled “Invite a teammate”- Open the project and go to Settings → Access.
- In the Members panel, find Invite Link and click Create Link (the button reads New Link if a link already exists).
- Click Copy and send the link to your teammate through any channel (chat, email, ticket).
- Sending the link does not add anyone. Your teammate opens it and requests access, then you approve them under Pending Requests (see Approve or deny requests). They join the project — as an admin (see Roles) — and appear in the Members list only after you approve.
One link works for your whole team: share the same link with several people, and each opens it and requests access separately. You do not need a new link per teammate.
The panel shows and manages your most recently created invite link. From here you can:
- New Link — create a fresh link. This does not revoke the previous link: the old URL keeps working until it expires (see below) and, once replaced, is no longer shown in the panel — so you can no longer revoke it there. If you want the old URL dead immediately, click Revoke before creating a new one.
- Revoke — immediately disable the shown link. Anyone who already joined keeps their access; only the link stops working.
Because a replaced link stays live until it expires, treat Revoke-then-New-Link as the safe way to rotate — especially since everyone who joins becomes an admin.
Invite links carry an expiry (shown as “Expires …”) and a use count so you can see how much a link has been shared. Expiry length is configurable by self-hosters via PROJECT_INVITE_DEFAULT_EXPIRY_DAYS and PROJECT_INVITE_MAX_EXPIRY_DAYS.
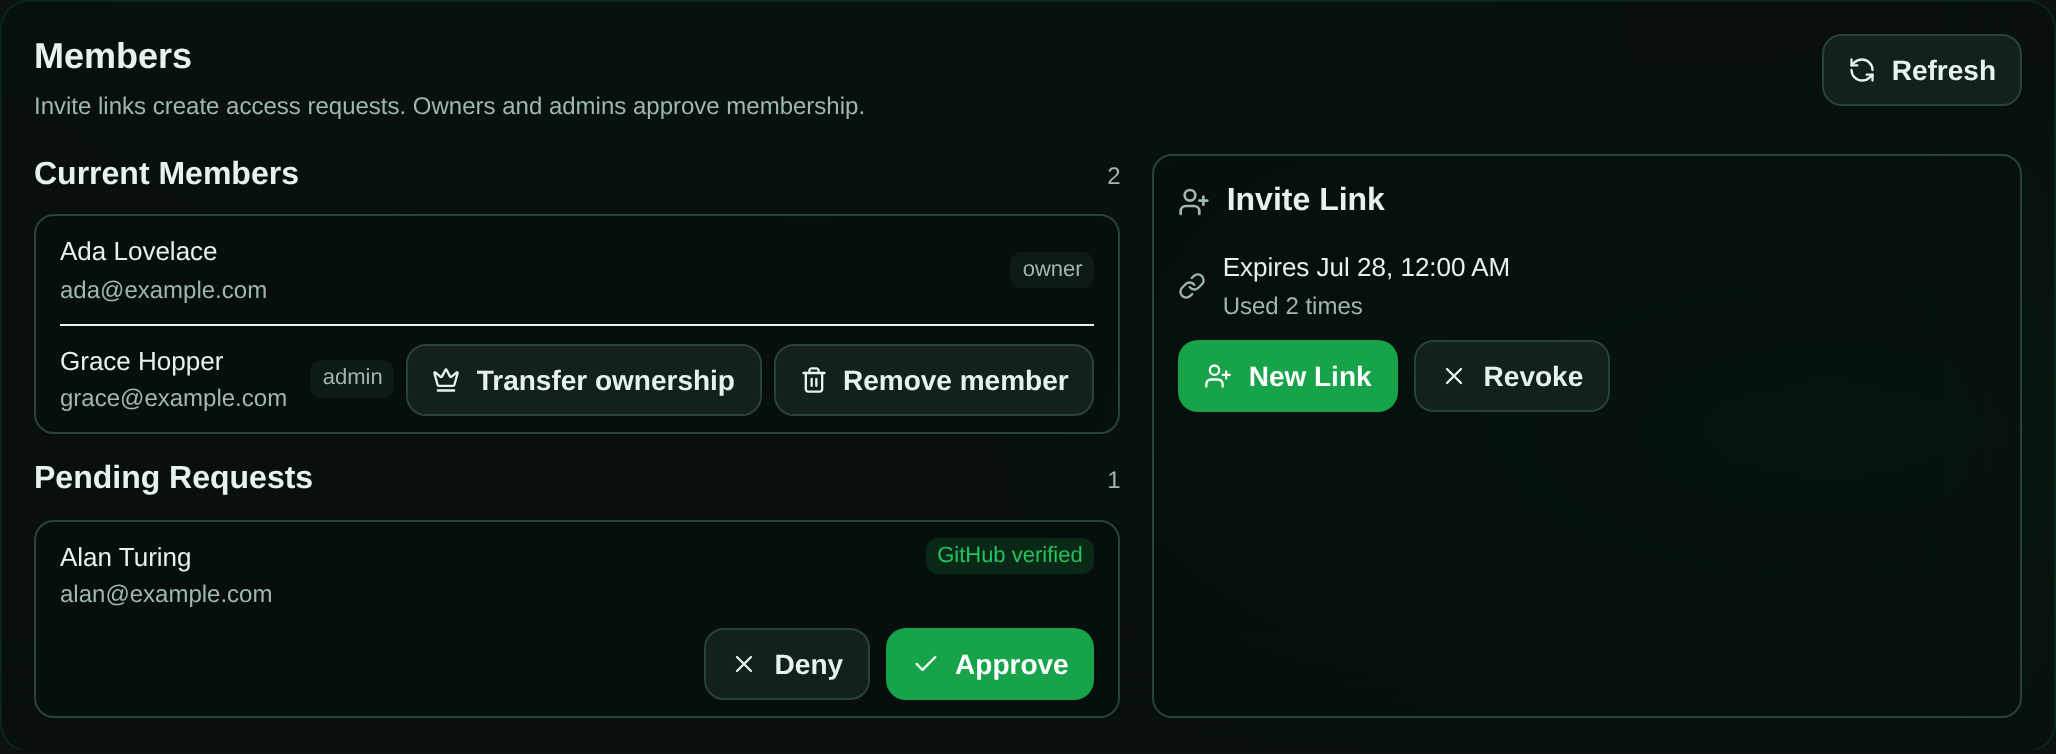
The Members panel is the single place owners and admins manage everything: the invite link, current members and their roles, and any pending access requests.
Request access (the recipient’s view)
Section titled “Request access (the recipient’s view)”When someone opens an invite link, they land on a page that shows the project name and repository and a single Request Access button.
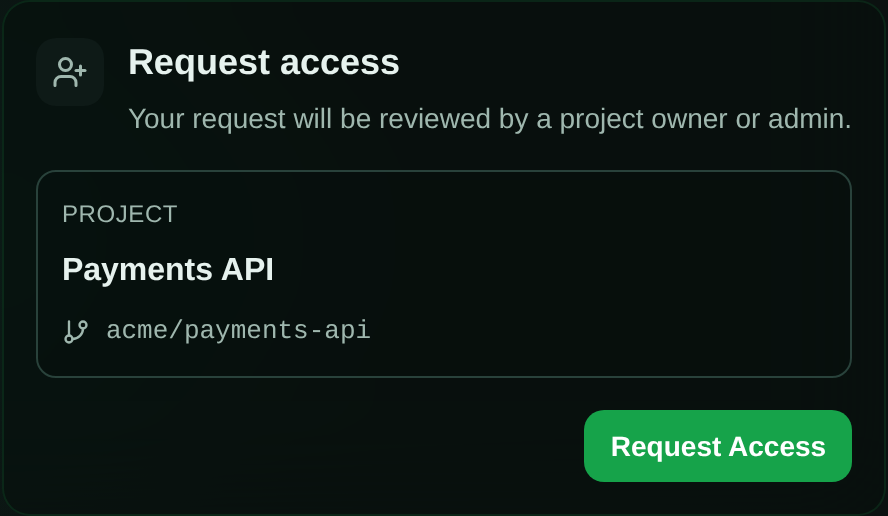
- Clicking Request Access creates a pending request and shows “Your request will be reviewed by a project owner or admin.”
- If the repository is on GitHub, SAM checks whether your GitHub sign-in already has access to that repository and shows the result on the request (for example “GitHub sign-in needed” or “no repo access”) so approvers can decide. If you see “GitHub sign-in needed,” connect GitHub in your SAM settings so SAM can confirm your repository access.
You must be signed in to SAM to request access. If you do not have a SAM account yet, create one first (SAM uses GitHub or Google sign-in), then re-open the invite link to return to the Request Access page.
How you’ll know you’re approved. SAM does not email you when a request is approved. To check, re-open the same invite link — once an owner or admin approves you it shows Open Project — or open the project directly from your SAM dashboard, where approved projects appear in your project list.
Approve or deny requests
Section titled “Approve or deny requests”Owners and admins manage requests from Settings → Access → Members:
- Pending requests appear under Pending Requests with the requester’s name, email, and a GitHub-access badge.
- Click Approve to add the person to the project (as an admin), or Deny to reject the request.
- A denied person can request access again while the link is still active — denial is not a permanent block.
What teammates share
Section titled “What teammates share”Once someone is a member, the project becomes genuinely shared. Any active member can use the project’s shared resources regardless of who created them:
- Agent profiles — the model, agent, and settings bundles configured for the project.
- Skills — reusable, repeatable-work configurations.
- Project environment variables and secrets — supplied to workspaces and tasks in the project.
- Project files and runtime assets — files SAM copies into each workspace.
- Chat sessions — everyone’s sessions appear in the same list. A filter near the session search toggles between my sessions and all sessions so you can focus on your own work or watch everything happening in the project. See Chat Features → Session filters.
What stays personal:
- Answering your agent. When an agent stops to ask for permission, ask a question, or send a link to open, only the person who started that chat, and anyone they shared it with, can see the request and answer it. Other teammates see that the chat is waiting (Needs input), not what it asked — see When the Agent Needs You.
- Your API keys and cloud credentials are yours. SAM never shows a teammate your raw keys. The one exception is a chat you choose to share: its agent runs on your keys and can read them — see Share a chat.
- Nodes (the VMs that host workspaces) are user-scoped resources, billed to the credential that provisioned them.
For repository work, SAM lets a member’s workspace use the project’s GitHub App installation to clone and push — but only after re-verifying that the running member still has access to that repository on GitHub. If a member loses GitHub repo access, their authenticated clone fails fast rather than silently falling back to an unauthenticated clone.
Work together in a chat
Section titled “Work together in a chat”Comment on a teammate’s chat
Section titled “Comment on a teammate’s chat”Anyone in the project can comment on any message in any chat, including chats a teammate started.
Select a message, or some text in it, and choose Comment. Everyone in the project can read the
comment, and so can agents in the project (they read comments with the
list_message_comment_threads MCP tool).
A comment never messages the agent by itself. The agent sees it only if it looks, or if someone who controls the chat sends it on (see Send a comment to the agent).
Mention a teammate
Section titled “Mention a teammate”Type @ in a comment or reply and pick a person from the list. They get a Mention notification
that opens the thread. Only people you pick from the list are notified: typing @name by hand does
not notify anyone. You can mention active project members, up to 10 per comment by default.
The owner of a chat is also notified about new comments on it, and people in a thread are notified about replies. These Comment notifications are grouped: each person gets at most one per chat every 10 minutes. A Mention is never grouped. Admins can change both limits under Admin settings → Collaboration.
Send a comment to the agent
Section titled “Send a comment to the agent”Send to agent turns a comment into a message for the agent. The message quotes the comment and the message it is about, and shows who sent it. Only the chat’s owner and people it is shared with can send a comment to the agent. Everyone else can comment, but not send.
Share a chat
Section titled “Share a chat”The owner of a chat can let a teammate drive it for 5, 10, 30 or 60 minutes: send messages with files, schedule messages, interrupt the agent, stop, sleep or archive the chat, answer the agent’s questions, and look through the repository’s files and changes. These are the same controls the owner has in that chat. Open the chat, select Share in the tool rail, then Add a teammate, choose how long, and confirm.
Before you share, know what it means:
- It runs on the owner’s accounts. A teammate’s messages go to the owner’s agent, on the owner’s AI subscription or API key, the owner’s compute, and the workspace’s GitHub access. Work it starts is billed to the owner.
- The agent can read the owner’s keys, so a teammate who drives it can ask it to print them and
keep using them after their access ends. That is the owner’s AI key or Claude/Codex sign-in, and
on GitLab projects the owner’s GitLab sign-in, which reaches all of the owner’s GitLab projects.
On GitHub projects the agent only has a one-hour token for the project’s repository. A teammate
can also open files such as
.envin the Files panel. Share only with people you trust. SAM asks you to confirm before it shares. - Access lasts the time you choose. You pick 5, 10, 30 or 60 minutes every time. There is no default and no “until removed” option. When the time is up, access ends on its own. Only the owner can extend it, with Renew, which starts a new period from now.
- Ending access undoes nothing. It doesn’t reverse what the teammate did, and keys they copied keep working until you replace them. If the agent is already working on something they asked for, it finishes; SAM doesn’t stop the agent or the chat.
- It covers that one chat. It gives no access to the owner’s other chats, settings or keys.
What SAM enforces:
- You can share a chat while it is running or asleep (not after it has ended), and only with active members of the project. Once you share, their messages are handled exactly like yours.
- SAM’s servers check the time on every action and again just before a queued message goes to the agent. A browser’s clock or countdown has no say. Messages a teammate queued that haven’t reached the agent when their time runs out are cancelled and marked Not delivered — access expired, on every open page as well as after a reload.
- People a chat is shared with can share it onward, but never for longer than their own access lasts, and can remove anyone’s access. Removing someone also removes anyone they added.
- Share shows when each person’s access ends. A teammate sees their own time left above the message box, and their message box locks when it runs out.
- A chat can be shared with up to 10 people at a time by default (an admin setting).
- Each message shows who sent it (for example Ana · shared access), and the agent is told who is speaking.
- A teammate can attach files to their messages. The files are their own uploads, and they go only into this chat’s workspace, checked against their access just before each file is copied and again before the message is sent.
- A teammate can open the Files and Git panels, read-only and limited to the repository
folder: they can list, view, download and diff any file in it, including untracked files such as
.env, but nothing outside it, nothing in a.gitfolder (the repository’s or a nested one’s), and no link that points outside it. This limits the panels only; the agent itself can still read anything in the workspace, as the warning above says. If the workspace runs an older agent that can’t enforce the limit, the panel says so and shows nothing until the workspace restarts with a newer one. - A teammate can schedule a one-off message into the chat (see Scheduled actions). It shows as theirs, marked scheduled, is sent only while their access lasts, and is cancelled when their access ends. A teammate’s agent can’t schedule into the chat for them. Standing watches are lasting rules, so only the owner can point one at their chat.
- The terminal, port previews and the workspace page stay with the owner: they reach the whole workspace, and SAM can’t cut off a live terminal or port connection when access ends. Fork and Retry in the rail work for a teammate and run on the teammate’s own accounts; forking an archived chat, which restores the owner’s saved files, stays with the owner.
- If either person stops being an active project member, the teammate loses access at once.
Remove access
Section titled “Remove access”Access ends on its own when its time is up. To end it sooner, open Share and select Revoke now next to a person, or Leave to remove yourself. Access ends immediately, and their open page locks without a reload, even while the chat is asleep. Their messages that haven’t reached the agent yet are cancelled and marked Not delivered — access was removed, and their scheduled messages that haven’t been sent are cancelled. A message the agent already received can’t be taken back, and work it has started keeps running. When a member is removed from the project, SAM also deletes the access they held and the access on chats they own.
To give someone access again after it ended, add them again from Add a teammate.
Who pays: credential attribution
Section titled “Who pays: credential attribution”Sharing a project raises a practical question: when a teammate’s trigger or task runs, whose API key and cloud credential pays for it?
By default, a resource runs on the personal keys of the member who set it up — a teammate’s trigger bills the teammate’s key, not yours. The catch is shared automation: if you create a trigger on your personal key, the whole team benefits from work that keeps charging you. To make this visible, a shared project shows a Credentials indicator in the project navigation.
- The indicator only appears once a project is actually shared (more than one member, an active invite link, or a pending request) and there are credential-backed resources. If you do not see it, the project either is not shared yet or has no credential-backed resources (triggers, running tasks, nodes, or deployments) to attribute — it appears as soon as one exists.
- It shows a small badge — for example how many resources still run on personal keys, or “No shared keys” when everything is covered.
- Clicking it opens the Credential Attribution panel, which lists credential-backed resources (triggers, running tasks, nodes, deployments, and project credential attachments) grouped by type. Each row names the resource and the member whose credential it uses, and shows whether it is covered by a project credential (green check) or a personal key (warning) — so you can tell your own resources from a teammate’s.
You have two levers, depending on your goal:
- Move the cost onto a shared key — click Fix on a personal-key row to go to Settings → Connections and attach a project-scoped credential. Members’ sessions then use the shared project credential instead of an individual’s key. (If you attach your own key as the project credential, you are still the one paying.)
- Stop the work entirely — disable or delete the trigger or task from the Triggers page (or the resource itself). Attaching a credential changes who pays; it does not stop the automation.
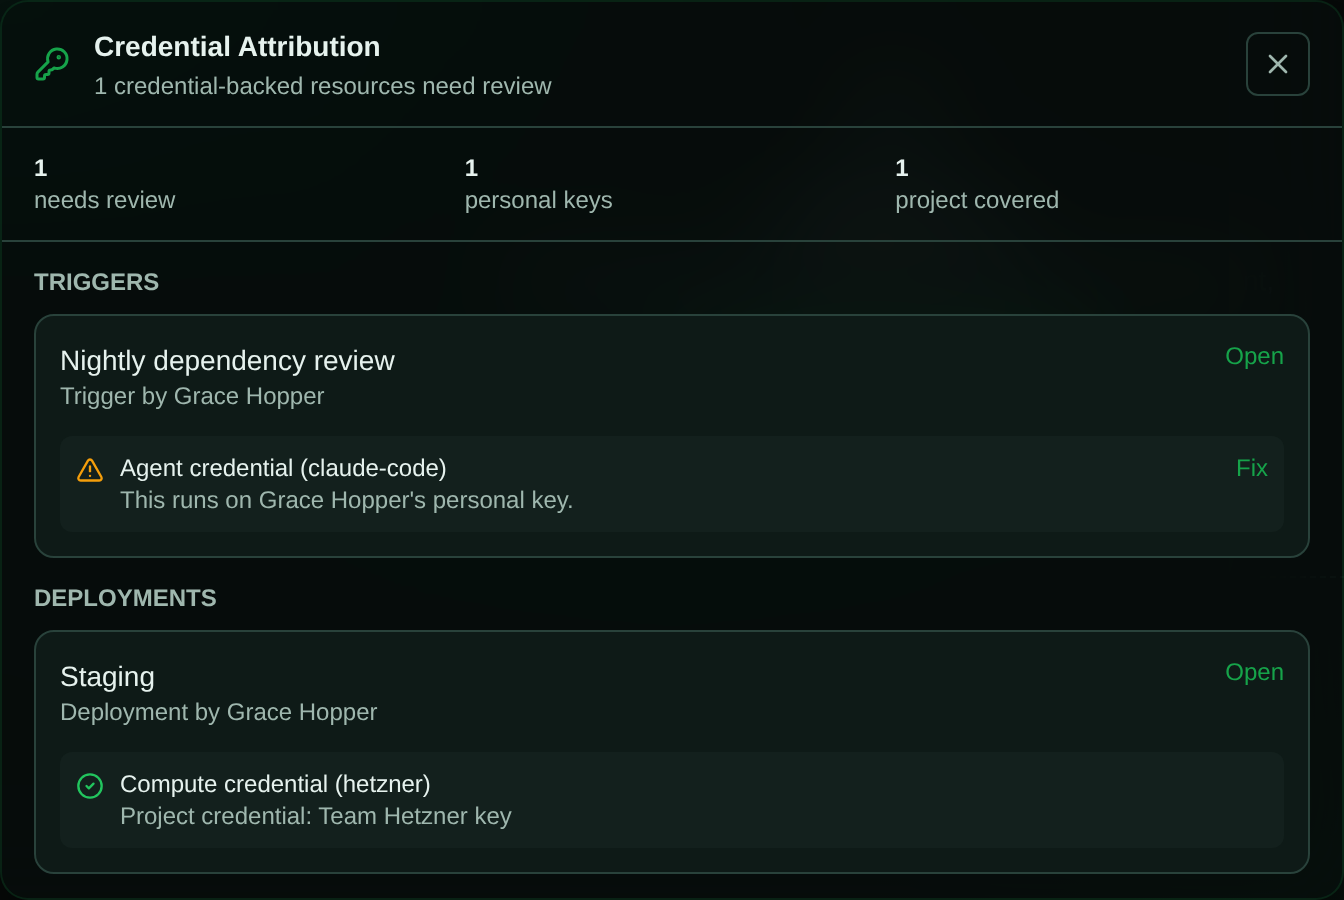
The goal is not to block sharing — invites and approvals continue regardless. It is to give the team a clear view of which shared work runs on an individual’s personal keys, so you can decide, deliberately, what to move onto a shared credential and what to leave as-is.
Manage members
Section titled “Manage members”The Members panel under Settings → Access lists every member with their role and status. From here owners and admins can:
- Transfer ownership (owner only) — promote an admin to owner. The current owner becomes an admin and keeps admin controls; only ownership-specific actions move to the new owner. Personal credentials are never copied or moved.
- Remove member — remove another non-owner member from the project.
- Leave project — any non-owner member can remove themselves.
Offboarding: what happens to a departing member’s resources
Section titled “Offboarding: what happens to a departing member’s resources”Removing a member or leaving a project opens an offboarding step that previews the resources tied to that member — triggers they created, running tasks, attached credentials — and makes you choose what happens to each before finalizing. This exists precisely so a departure does not silently break shared automation.
The key thing to understand: personal credentials leave with their owner. A resource that was running on the departing member’s personal key will stop working once they are gone unless you re-point it at a project credential. The preview lets you decide, per resource:
- Keep it running on a shared key — point the resource at an existing project credential (the Use existing project credential option) so it survives the departure. This is how you keep a nightly trigger or a deployment alive. You need a compatible project credential connected under Settings → Connections.
- Disable it — a trigger is disabled and flagged, and a task’s future work is stopped and flagged, so nothing runs silently broken.
- Defer — postpone a resource instead of resolving it now. Deferring does not clear a block, so any resource that blocks removal (see below) still has to be disabled, reattached, or deleted before you can finish.
Some resources block removal until they are resolved, so you can’t accidentally remove a member out from under running work, and each type clears the block differently: a trigger clears it when you disable it or reattach it to a project credential; a task clears it only by stopping its future work (tasks can’t be reattached); a node or deployment clears it only by reattaching to a project credential. If no compatible project credential is available for a node or deployment, stop or delete it separately before finishing the removal.
Combined with the credential-attribution indicator above, this keeps a member’s exit from unexpectedly cutting off the team’s automation — you decide, up front, what survives.
Related
Section titled “Related”- Chat Features — the session tool rail, session filters for shared projects, forking, and the command palette.
- Notifications — mention, comment and shared-chat notifications.
- AI Agents — agent profiles and provider modes that members share.
- Webhook Triggers — automated work that runs on a project credential or a member’s personal key.